
Each instruction will include an instruction number, an overall mileage, a tulip diagram and an information cell. The overall mileage will count up from the start or any place where you are instructed to reset your mileage, such as a checkpoint.
The tulip diagram is a graphical representation of the location for the instruction. Normally this is an intersection of two or more roads, or a feature of a road. The tulip always has two features, the dot and the arrow. No matter how the tulip is oriented, you always will travel from the dot to the arrow for that instruction. Normally the tulips are drawn so you are traveling from the bottom of the tulip, but this doesn't have to be the case.
Here is a sample note:
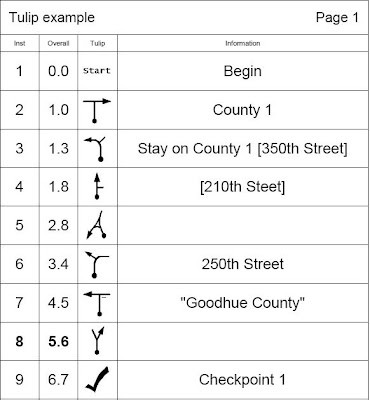
The first tulip of instruction 1 ("Begin") shows that the mileage is zero, so you would want to zero your odometer at that instruction.
The 2nd shows that you will approach a T intersection (in this case it's County road 1) and take a right. This intersection is aproximately 1.0 miles from the last zero.
The third instruction shows that the road turns left, with another road branching off on the right. When a road is in brackets, ex. [350th street], it is indicating the intersecting or connecting road, but NOT the road you take. So in our example above, we stay on County 1 which bends to the left and 350th street intersects from the right.
Instruction 4 is similar. Since 210th street is in brackets [], it indicates the intersecting road is 210th street, but the tulip shows we keep going straight.
!! When in doubt, always follow the tulip and ignore the street or road names provided.
Instruction 5 shows a more complex intersection that we approach from the bottom right and end up taking a hard left a the delta.
Instuction 6 shows that the road we are on bends right, but we take 250th Street that intersects from the left.
When information is in quotes and a small dash is shown on the tulip, as shown in instruction 7, it indicates the text that is on a sign. That sign will be where the dash is shown at the intersection.
Instruction 8 simply shows that we take a right at a Y intersection and that intersection is at approximately 5.6 miles from the last odometer zero.
Tulip 9 shows the location of a checkpoint.
In summary, the text is normally there to provide or clarify the instruction, but the primary thing you should focus on is the tulip.
Always travel from dot to arrow, no matter how the tulip is oriented on the page.
Taken from http://ragnarok105.blogspot.com/
